If you need to sell merchandise, meal tickets or guest tickets for example, during the registration process, you can create a store
Where to go?
From your event dashboard go to "Registration configuration" -> "Stores"

Then, creating a store is a 3 steps process.
1st step: Add a new store
Click on the ![]() button and fill in the pop up:
button and fill in the pop up:
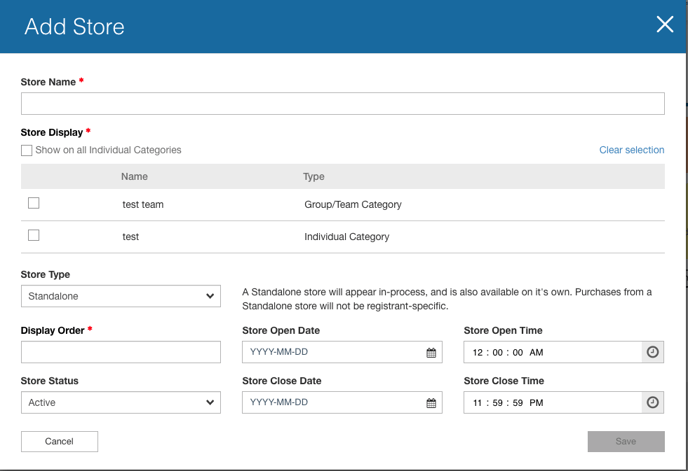
Store name: Will display at the top of the screen
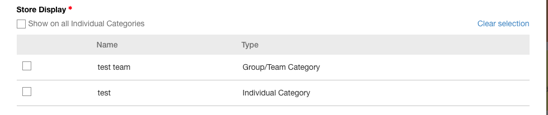
Store display: You can choose whom the store is available to access: for the entire event registrants, or only to people registering for a specific category (individual or team)
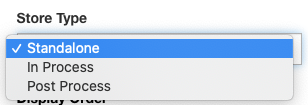
You have 3 choices of how you wish to display your store to users:
Standalone: Can be accessed by anyone who visits your registration page. Users do not need to be registered in order to purchase from this store display
In Process: Can only be accessed during the registration process. Users cannot purchase items for this store display without completing the registration
Post Process: This store is accessed through the Registration landing page. Can only be accessed by users after they have completed their registration
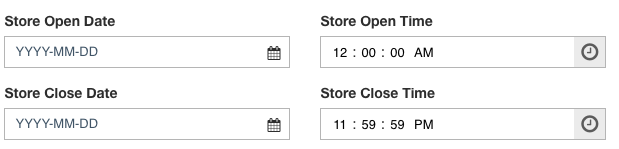
Optional: Store open and close date / Status If you need your store to be available only up to a certain date, you can set up a date range and the store will open/close automatically
Single Purchase: The item can only be purchased once
Required Purchase: Individuals must purchase an item from the store
Are the items in this store mandatory purchase options?: The item is automatically added to the individual's cart
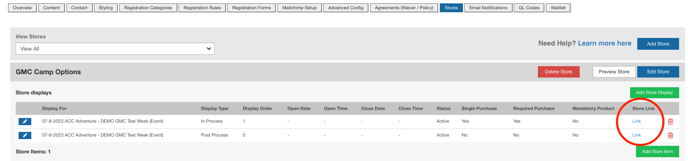
Once you've created your store, it will show up on your dashboard, as below. However, you now need to create the store items you want to sell.

2nd step: Add a store item
Click on the ![]() button and fill in the pop up:
button and fill in the pop up:
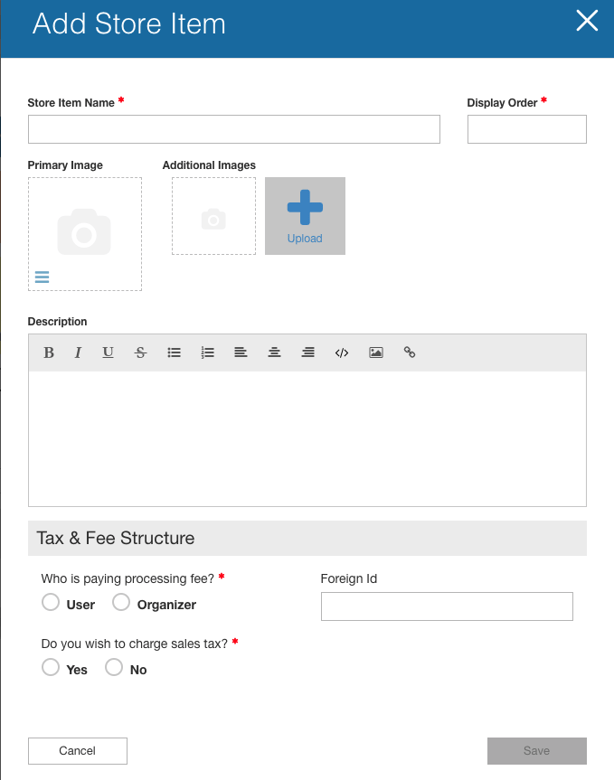
Store item name: Eg. "T-shirt" "Meal ticket" "Book" ect...
Display Order: Will define the order the items will show up on the screen when people open the store
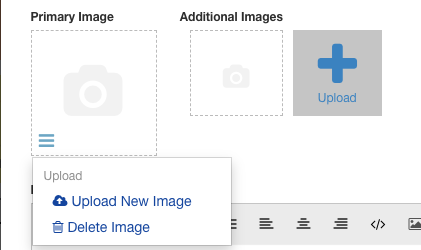
Images: You can upload images to give people an idea of what they can buy or an icon to make your store more user-friendly
Description: Will help people to understand what exactly is the product.
Tax & fee structure: We charge processing fees on store products, also, it's up to you to decide who's paying for those fees. You can also add taxes if you need to collect any.
3rd step: Add purchase options on your store item

Each store item needs to have at least one purchase option (price) that people can choose from. If you need to add more than 1 option, select the ![]() then select
then select ![]()
For example, if you're selling T-shirts you might want to sell 3 different sizes:

Purchase options: Name of the product to buy that will display on screen for people
Price: Can be the same of different for each option
Unlimited: If you don't have a limitation on the number of the item that can be purchase, keep the unlimited option to "Yes" - If you have only a specific quantity in stock, select "No" and enter your in-stock quantity in the "In stock" column.
Qty sold: As people go through your store, you'll see the quantity sold in your dashboard in this column.
Display order: The order the option will show up on the store for people to choose from
Per registration limitation: If you want registrants to be able to buy only 1 T-shirt, for example, you can set the per registration limitation to 1
Available: If you want to hide an option at some point, you can simply set the available option to "No"
You can also:
4th step: Access your store
Once your store has been created, you can access it through the Store Link in the Store Display. This will take into your registration process, and show you what the store will look like for registrants:
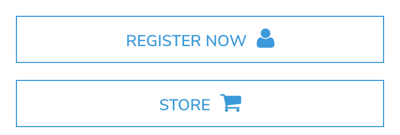
If you choose the "Standalone" option, your store will also be available from your registration page:
It will look as below:
