This document describes how to set up your registration process and create your registration options in the Interpodia System.
- CREATE A NEW REGISTRATION PROCESS
- From scratch: Follow our How to create a new registration process guide
- By cloning an existing registration process: Follow our How to clone a registration process guide
- SETUP REGISTRATION PROCESS LANDING PAGE (content, styling, contact)
- SETUP REGISTRATION PROCESS (Dates, Taxes & Processing Fees, Confirmation Email)
- CREATE REGISTRATION OPTIONS
- Need Help?
SETUP REGISTRATION PROCESS LANDING PAGE
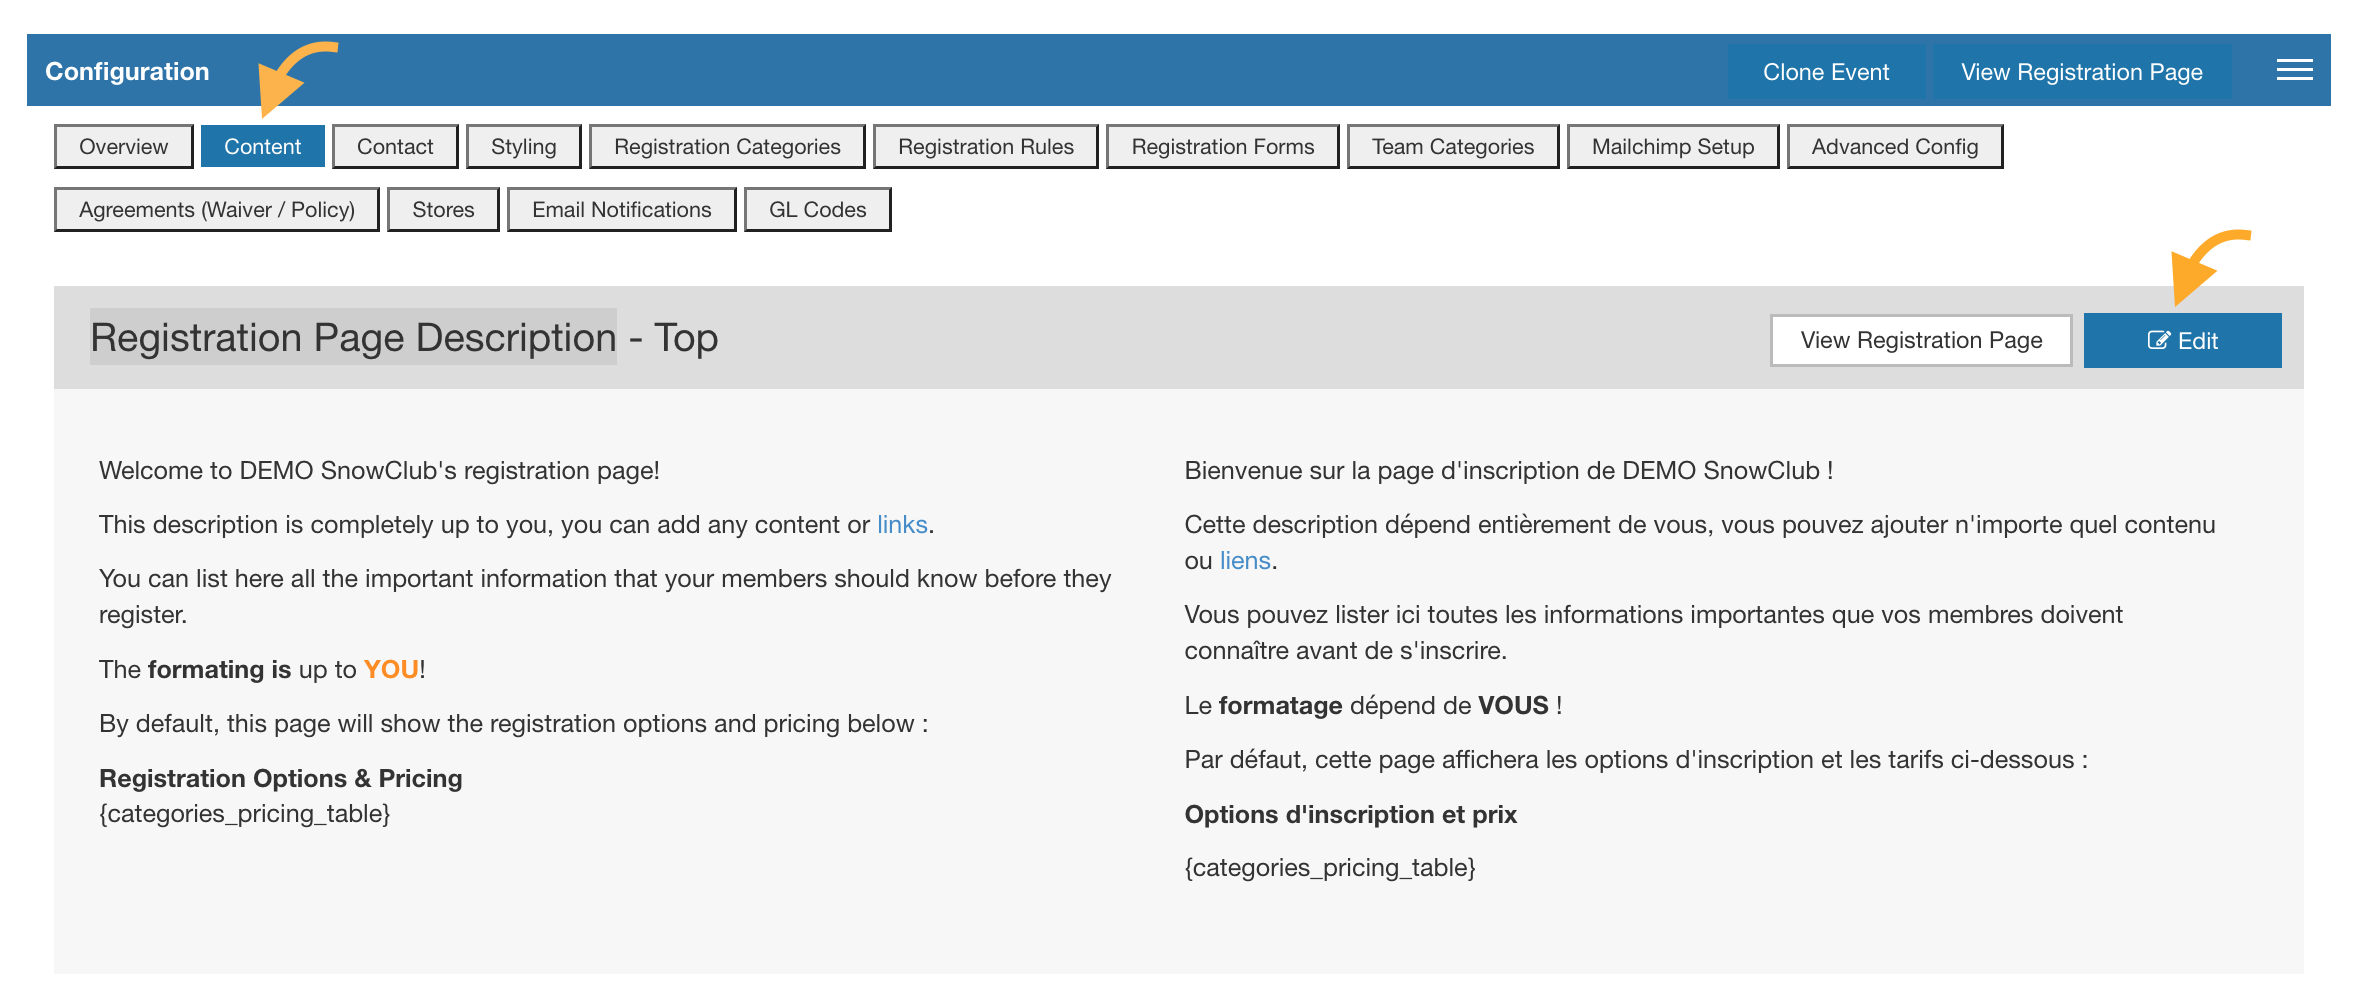
Main content - Under the Configuration tab, go to the Content sub-tab and edit the Registration Page Description section:
Custom Styling - Under the Configuration tab, go to the Styling sub-tab if you want to adjust any of the following:
- Theme color (button color)
- Hide some of the default content: Date / Logo / Address / Map
- Add custom content to the registration button names
- Update images: Logo / Background

Contact info - Under the Configuration tab, go to the Contact sub-tab and add your registration process contact details

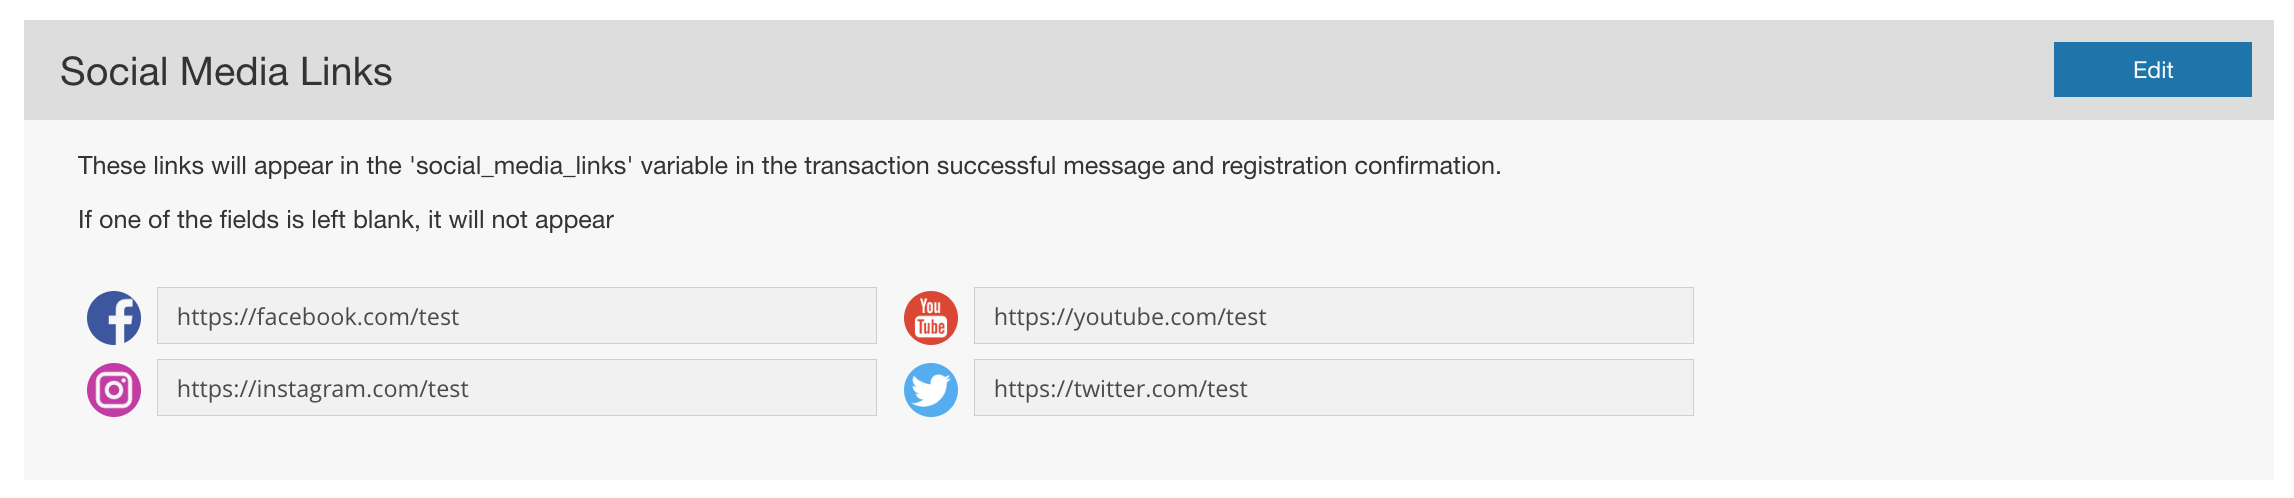
Social media links - Under the Listing tab, go to the Social Media Links section and add your registration process social media links (they will display under the register button on the landing page)

SETUP REGISTRATION PROCESS
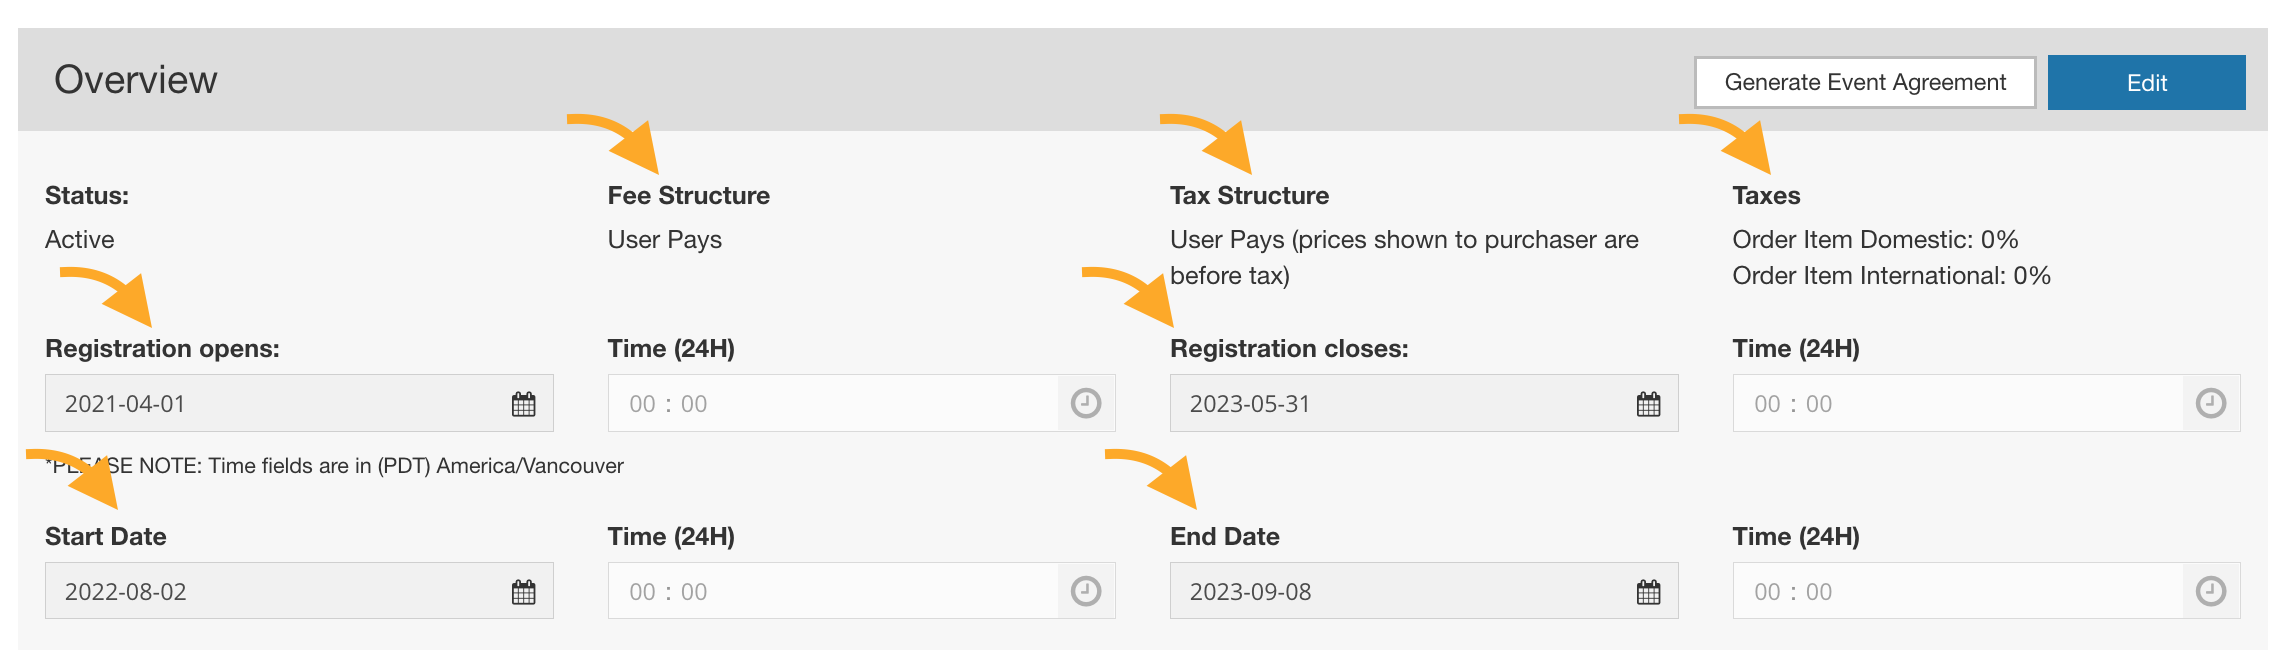
Under the Configuration tab, go to the Overview sub-tab, and review the following information:
- Registration open/close dates - you can adjust yourself
- Event/Activity Start/End dates- you can adjust yourself
- Taxes & Processing Fees Structure - If needed, please request an adjustment to our support team

Under the Configuration tab, go to the Content sub-tab and edit the Registration Confirmation Email Body section:


CREATE REGISTRATION OPTIONS
To create registration options in the Interpodia System, follow the five (5) steps below:
Step 1: Create a Registration Category
Under the Configuration tab, go to the Registration Categories sub-tab and create a registration category:

More detailed info is available in our How to add/edit registration categories for your registration process? guide
Step 2: Apply a Registration Rule (optional)
Important Things to Know About Registration Rules
- A registration rule dictates which PTSO membership (and corresponding NSO membership) must be purchased by the registrant. For simplicity, registration rules are listed using only the PTSO's terminology.
- It is the responsibility of the event admin to ensure the right registration rule(s) is applied to a
registration category. If you need assistance, contact info@interpodia.com. - There is no hierarchy between the different types of memberships, so you need to list all acceptable membership types in your rules
Examples
- If a participant needs AT LEAST membership A, you need to add 3 rules:
- Membership A
- Membership B
- Membership C
If I have either of those 3 I’ll be able to go through the process
- If a participant needs AT LEAST membership B, you need to add 2 rules:
- Membership B
- Membership C
If I have either of those 2 I’ll be able to go through the process - if I have membership A the system will ask me to upgrade
- If Participant needs a membership C, you need to add 1 rule:
- Membership C
If I have a Membership C I’ll be able to go through the process - if not the system will ask me to upgrade.
How to Apply a Registration Rule
Under the Configuration tab, go to the Registration Rules sub-tab.

You can either apply a registration rule to all registration categories (click Registration rules for all registrations) or apply a registration rule to an individual registration category (click Registration rules per registration category)

Click Add Rule (green button). Click Membership or Licence. Under the Membership Organization options, select your PTSO (for the current season).
Note: if your PTSO's name is not available - please contact info@interpodia.com

Under Membership Type, select the PTSO membership(s) (registration rule) that must be
purchased by the registrant. Please deselect, as needed.

Click Save. (Click the Actions button to edit an existing registration rule.)
Step 3: Add registration forms (optional)
In order to collect extra information about your participants, you can create registration forms. You can either apply a registration form to all registration categories or apply a registration rule to an individual registration category (you can select the display option when creating a new form).

More detailed info is available in our How to create-update registration forms for my registration process guide
Step 4: Add agreements (optional)
In order to collect extra digital signatures from your members, you can create agreements/documents. you can either apply a registration form to all registration categories or apply a registration rule to an individual registration category (you can select the display option when creating a new form).

More detailed info is available in our How to add-update online agreements (waiver / policy) as part of my registration process? guide
Step 5: Test Registrations
You are strongly advised to execute test registrations on newly created registration options before opening registration to the public.
When executing test registrations, always ensure your cart is empty and do not click the Submit and Complete button. If you accidentally click the Submit and Complete button, ensure the test registrations are deleted.
Need Help?
Interpodia Knowledge Base
Clubs can also consult Interpodia's bilingual Knowledge Base for how-to guides, articles, and helpful hints.
Technical Support
Need help? Send an email with your queries to info@interpodia.com. Allow 1-2 business days for a response.
There is also a chat box available within the dashboard. The chat box is located at the bottom-right of the dashboard and is visible from Monday to Friday between 7:00 AM and 5:00 PM PDT.
Response time ranges from a few minutes to a few hours.
Questions in English and in French are welcome!