This guide is an overview of all the options you can edit in order to create a registration process that fits all your needs.
Table of content
You can access the overview description about what each tab of your setup dashboard is for by clicking on the title of each section.
1. Dashboard View
1. Dashboard View
On the Organizer's dashboard navigate to the left side and select Events.

This will lead you to the list of your different events you have created so far. Once you open one of your events, you may have two different layouts
1. Tabs View

2. Simplified View

In order to navigate on your dashboard in that view, you can click on the 3 parallel line on the right. A dropdown menu will open to allow you to configure your different pages.

⇑ Back to the table of content
2. Dashboard Home

Registration Activity
You will start to see numbers and registrations here as soon as your event is live. Find out how to set your event live below!

Admin Permissions Setup
Shows the different account that have access to visualize the dashboard. On the left, you have the responsible on the Account (Seen in Financial and Accounting). On the right, you can add specifict eam members that will need access for this specific event
Financial & Accounting
Shows the different financial configurations in place for the organization.
- Financial Account
- Payment Processor (If configured)
- Applicable taxes - On PROCESSING FEE and REGITRATION PRICE
- Who pays the processing fees
- Optional Refundable Registration (contact us if you would like to Activate/Deactivate
⇑ Back to the table of content
3. Event listing tab
The Event Listing tab records the main information about the event: name / date / address / URL
Note: Make sure to always double-check before submitting for revision!

⇑ Back to the table of content
4. Configuration Option
4.1The Minimal Structure of a Dashboard
4.1.1 Overview

This tab will allow you to:
- View the current status of your registration process
- Set the date range of the registration, when people will be able to start registering and when is the last day when they can register
- Set the date range of the event you are hosting the event
- Passphrase enable: if that option is ticked the person will be asked to enter the defined password to access the registration page

⇑ Back to the table of content
4.1.2 Content

This tab allows you to:
Registration Page Description
- Update the main content that will be displayed on the registration page – the default is the pricing table. Any information in the box (A) here will show up in (B) red box
A - 
B - 
Email Personalization
- Update your "Email Header" and "Registration Confirmation Email Body". The default is shown in the images below. In order to update this, just click edit to the right of the screen

Transaction Success Personalization
- Update your "Transaction Successful Message". You can edit this section by clicking the edit button to the right of your screen.

⇑ Back to the table of content
4.1.3 Contact information
The contact information is the information that is being shared to your member by our team if we need to redirect them to your management.

Also, the email and phone number will appear on your registration page as shown below.

⇑ Back to the table of content
4.1.4 Styling
From that tab, you can change the look of the registration page
Theme and Color Configuration
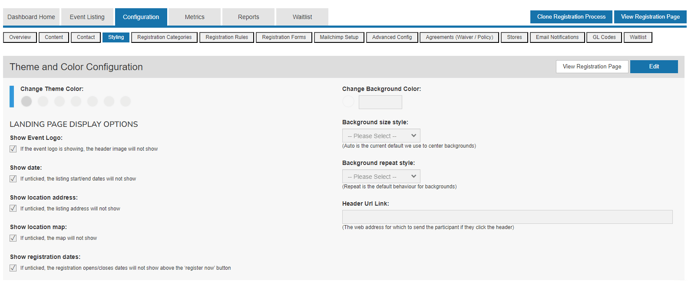
You can:
-
Change the color of the button / theme of your page
- Add a logo /
- Add a background image.
- and so much more
Registration Buttons Management

⇑ Back to the table of content
4.1.5 Registration categories
From this tab, you can update the different categories options : Capacity / Discount / Price / Requirements

To edit a category, you can press on the blue icon on the left of your existing category

For each category, you can personalize it and and create specific requirements for the program.
⇑ Back to the table of content
4.1.6 Registration rules
A registration rule is a way to control the other membership that a member may need to participate to an activity. It can be from your membership organization, or it could be another event or a club.

The system works with a OR logic, unless you add as well a Event/Event registration rules as well. In that specific case, the system will use a AND logic.

For processes requiring multiple Events/Clubs rules, the system will ask you to confirm the logic you prefer

In most cases, you only need to list all possible PTSO memberships, or your member will be required to buy one listed.
![]()
If multiple PTSO memberships fullfill the requirement, make sure to add all of them.
This is because the system does not know the hierarchy between the different types of memberships, so it compares the membership linked to the registrant's profile to the list of rules and if it matches with one of the option the person will be able to register, if not the person will need to buy a membership among the ones listed in the rules.
Also, you can set up the rules for all registrants:

Or for each category: (those rules take over all registrants rules)

If you are unsure about which membership is required, make sure to contact your membership organization.
4.2 Additional Features
4.2.1 Registration forms
A form is a list of questions you can include in your registration process. Forms can be displayed for all registration categories or for only specific ones.

The questions can be common to all registrants or specific to a category:

⇑ Back to the table of content
4.2.2 Group registration categories
Team categories can be useful Family registrations or Teams registrations for your events. It can be from your Registration Category tab.

This option is by default not active, but you can start the configuration yourself by selecting Yes

The configuration of that option can be tricky. Don't hesitate to contact us to inquire some assistance in the process.
⇑ Back to the table of content
4.2.3 Combo registration categories
Combo categories can be useful if you want to give specific prices when your members could choose multiple options of programs for your events. It can be from your Registration Category tab.
This option is by default not active, but you can start the configuration yourself by selecting Yes

The configuration of that option can be tricky. Don't hesitate to contact us to inquire some assistance in the process.
⇑ Back to the table of content
4.2.4 Mailchimp Setup
If you have a Mailchimp account, you can link it to your event and each registrant email will be added to your list.

⇑ Back to the table of content
4.2.5 Advanced config
From that screen, you can personalize the registration message throughout your process.

4.2.6 Waivers
It is possible that you may need to add agreement for your registration. You can add all of them in your Agreements (Waiver/Policy) tab.

All agreements can be offered in English and French and select its audience.

4.2.7 Stores
You can add a store to your registration process to sell marchandise or additional entrance tickets, for example. Please check our detailed articles below to know more about store setup.
⇑ Back to the table of content
5. Need Help?
Technical Support
Each platform has a Support section on the top bar.

It will redirect you to our support page with our contact information specific for each platform, and a direct contact form. 
Allow 1-2 business days for a response.
There is also a chat box is available from within the club dashboard. The chat box is located at the bottom-right of the dashboard and is visible from Monday to Friday between 7:00 AM and 5:00 PM PDT. Response time ranges from a few minutes to a few hours.
Questions in English and in French are welcome!
Can we talk?
If you prefer to speak one-on-one with the support team, please request a phone or video call by sending an email to info@interpodia.com with your availability.
KNOWLEDGE BASE
Clubs should check out Interpodia’s bilingual Knowledge Base, which includes guides, articles, and helpful hints.